Simulating a regular spiking Izhikevich neuron#
See also the interactive version.
Note: this is a more detailed description of the first example which is available as an interactive Juptyer notebook on the next page.
In this section, we wish to simulate a single regular spiking Izhikevich neuron ([Izh07]) and record/visualise its membrane potential (as shown in the figure below):
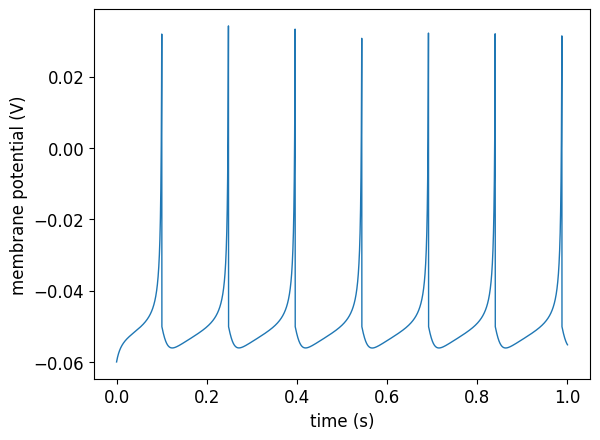
Fig. 8 Membrane potential of the simulated regular spiking Izhikevich neuron.#
This plot, saved as example-single-izhikevich2007cell-sim-v.png, is generated using the following Python NeuroML script:
#!/usr/bin/env python3
"""
Simulating a regular spiking Izhikevich neuron with NeuroML.

File: izhikevich-single-neuron.py
"""

from neuroml import NeuroMLDocument
import neuroml.writers as writers
from neuroml.utils import component_factory
from neuroml.utils import validate_neuroml2
from pyneuroml import pynml
from pyneuroml.lems import LEMSSimulation
import numpy as np


# Create a new NeuroML model document
# component_factory: form one: provide name of NeuroML class as string
# advantage of this form: do not need to import all the ComponentType classes
# before using them
nml_doc = component_factory("NeuroMLDocument", id="IzhSingleNeuron")
# component_factory: form two: provide class as argument
# nml_doc = component_factory(NeuroMLDocument, id="IzhSingleNeuron")

# Inspect it:
nml_doc.info()

# Also see contents:
nml_doc.info(show_contents=True)

# Define the Izhikevich cell and add it to the model in the document
# the `add` will create and validate the new component, and add it to the
# parent (nml_doc)
izh0 = nml_doc.add(
    "Izhikevich2007Cell",
    id="izh2007RS0", v0="-60mV", C="100pF", k="0.7nS_per_mV", vr="-60mV",
    vt="-40mV", vpeak="35mV", a="0.03per_ms", b="-2nS", c="-50.0mV", d="100pA")

# Exercise 1: give wrong units of a parameter/parameters
# Exercise 2: skip out a few parameters

# Inspect the component
izh0.info()

# Inspect the component, also show all members:
izh0.info(True)

# inspect the document
nml_doc.info(show_contents=True)

# Create a network and add it to the model
# net = component_factory("Network", id="IzNet")
# Throws an error: why?
# Because a Population is necessary in a Network, but we have not provided one.
# Two workarounds:
# - create population first, and pass that to component_factory here
# - disable validation
net = nml_doc.add("Network", id="IzNet", validate=False)

# Create a population of defined cells and add it to the model
size0 = 1
pop0 = net.add("Population", id="IzhPop0", component=izh0.id, size=size0)

# Define an external stimulus and add it to the model
pg = nml_doc.add(
    "PulseGenerator",
    id="pulseGen_%i" % 0, delay="0ms", duration="1000ms",
    amplitude="0.07 nA"
)
exp_input = net.add("ExplicitInput", target="%s[%i]" % (pop0.id, 0), input=pg.id)

# Write the NeuroML model to a file
nml_file = 'izhikevich2007_single_cell_network.nml'
writers.NeuroMLWriter.write(nml_doc, nml_file)
print("Written network file to: " + nml_file)

# Validate the NeuroML model against the NeuroML schema
validate_neuroml2(nml_file)

################################################################################
# The NeuroML file has now been created and validated. The rest of the code
# involves writing a LEMS simulation file to run an instance of the model

# Create a simulation instance of the model
simulation_id = "example-single-izhikevich2007cell-sim"
simulation = LEMSSimulation(sim_id=simulation_id,
                            duration=1000, dt=0.1, simulation_seed=123)
simulation.assign_simulation_target(net.id)
simulation.include_neuroml2_file(nml_file)

# Define the output file to store simulation outputs
# we record the neuron's membrane potential
simulation.create_output_file(
    "output0", "%s.v.dat" % simulation_id
)
simulation.add_column_to_output_file("output0", 'IzhPop0[0]', 'IzhPop0[0]/v')

# Save the simulation to a file
lems_simulation_file = simulation.save_to_file()

# Run the simulation using the jNeuroML simulator
pynml.run_lems_with_jneuroml(
    lems_simulation_file, max_memory="2G", nogui=True, plot=False
)

# Load the data from the file and plot the graph for the membrane potential
# using the pynml generate_plot utility function.
data_array = np.loadtxt("%s.v.dat" % simulation_id)
pynml.generate_plot(
    [data_array[:, 0]], [data_array[:, 1]],
    "Membrane potential", show_plot_already=False,
    save_figure_to="%s-v.png" % simulation_id,
    xaxis="time (s)", yaxis="membrane potential (V)"
)
Declaring the model in NeuroML#
Python is the suggested programming language to use for working with NeuroML.
The Python NeuroML tools and libraries provide a convenient, easy to use interface to use NeuroML.
Let us step through the different sections of the Python script.
To start writing a model in NeuroML, we first create a NeuroMLDocument.
This “document” represents the complete model and is the top level container for everything that the model should contain.
nml_doc = component_factory("NeuroMLDocument", id="IzhSingleNeuron")
Let us define an Izhikevich cell that we will use to simulate a neuron. The Izhikevich neuron model can take sets of parameters to exhibit different types of spiking behaviour. Here, we define a component (object) of the general Izhikevich cell using parameters to show regular spiking.
izh0 = nml_doc.add(
    "Izhikevich2007Cell",
    id="izh2007RS0", v0="-60mV", C="100pF", k="0.7nS_per_mV", vr="-60mV",
    vt="-40mV", vpeak="35mV", a="0.03per_ms", b="-2nS", c="-50.0mV", d="100pA")
Now that the neuron has been defined and added to the document, we declare a network with a population of these neurons to create a network in a similar way. Here, our model includes one network which includes only one population, which in turn only consists of a single neuron. Once the network, its populations, and their neurons have been declared, we again add them to our model:
net = nml_doc.add("Network", id="IzNet", validate=False)

# Create a population of defined cells and add it to the model
size0 = 1
pop0 = net.add("Population", id="IzhPop0", component=izh0.id, size=size0)
Question: why did we disable validation when we created the new network component?
net = nml_doc.add("Network", id="IzNet", validate=False)
Let us try creating a network without disabling validation:
net = nml_doc.add("Network", id="IzNet")
It will throw a validation error:
ValueError: Validation failed:
- Number of values for populations is below the minimum allowed, expected at least 1, found 0
This is because a network must have at least one population for it to be valid. To fix this, we can either create the population before the network, or we can disable validation. Here we chose to disable validation because we knew we were immediately creating our population and adding it to our network.
Moving on, since we are providing a single input to the single cell in our network, we can add an ExplicitInput to our network.
See the supplementary section on the info function below to learn how you can find out that ExplicitInput could be used here.
The list of inputs included in the NeuroML specification can be found on the inputs page.
We use a pulse generator here, creating a new component and adding it to our NeuroML document.
To connect it to our neuron, we specify the neuron as the target using an explicit input.
# Define an external stimulus and add it to the model
pg = nml_doc.add(
    "PulseGenerator",
    id="pulseGen_%i" % 0, delay="0ms", duration="1000ms",
    amplitude="0.07 nA"
)
exp_input = net.add("ExplicitInput", target="%s[%i]" % (pop0.id, 0), input=pg.id)
This completes our model. It includes a single network, with one population of one neuron that is driven by one pulse generator. At this point, we can save our model to a file and validate it again to check if it conforms to the NeuroML schema (more on this later).
writers.NeuroMLWriter.write(nml_doc, nml_file)
print("Written network file to: " + nml_file)

# Validate the NeuroML model against the NeuroML schema
validate_neuroml2(nml_file)
Note that the validation here will re-run the tests our component factory and other methods use, but it also runs a series of additional tests that can only be run on the complete model. So, it is necessary to validate the model after it has been fully constructed.
Simulating the model#
Until now, we have just declared the model in NeuroML. We have not, however, included any information related to the simulation of this model, e.g. how long to run it for, what to save from the simulation etc.
With NeuroML v2, the information required to simulate the model is provided using a LEMS Simulation file. We will not go into the details of LEMS just yet. We will limit ourselves to the bits necessary to simulate our Izhikevich neuron only.
The following lines of code instantiate a new simulation with certain simulation parameters: duration, dt, simulation_seed.
Additionally, they also define what information is being recorded from the simulation.
In this case, we create an output file, and then add a new column to record the membrane potential v from our one neuron in the one population in it.
You can read more about recording from NeuroML simulations here.
Finally, like we had saved our NeuroML model to a file, we also save our LEMS document to a file.
simulation_id = "example-single-izhikevich2007cell-sim"
simulation = LEMSSimulation(sim_id=simulation_id,
                            duration=1000, dt=0.1, simulation_seed=123)
simulation.assign_simulation_target(net.id)
simulation.include_neuroml2_file(nml_file)

# Define the output file to store simulation outputs
# we record the neuron's membrane potential
simulation.create_output_file(
    "output0", "%s.v.dat" % simulation_id
)
simulation.add_column_to_output_file("output0", 'IzhPop0[0]', 'IzhPop0[0]/v')

# Save the simulation to a file
lems_simulation_file = simulation.save_to_file()
Finally, pyNeuroML also includes functions that allow you to run the simulation from the Python script itself:
pynml.run_lems_with_jneuroml(
    lems_simulation_file, max_memory="2G", nogui=True, plot=False
)
Here, we are running our simulation using the jNeuroML simulator, which is bundled with pyNeuroML. Since NeuroML is a well defined standard, models defined in NeuroML can also be run using other supported simulators.
Plotting the recorded membrane potential#
Once we have simulated our model and the data has been collected in the specified file, we can analyse the data. pyNeuroML also includes some helpful functions to quickly plot various recorded variables. The last few lines of code shows how the membrane potential plot at the top of the page is generated.
data_array = np.loadtxt("%s.v.dat" % simulation_id)
pynml.generate_plot(
    [data_array[:, 0]], [data_array[:, 1]],
    "Membrane potential", show_plot_already=False,
    save_figure_to="%s-v.png" % simulation_id,
    xaxis="time (s)", yaxis="membrane potential (V)"
)
On the next page, you will find an interactive Jupyter notebook where you can play with this example. Click the “launch” button in the top right hand corner to run the notebook in a configured service. You do not need to install any software on your computer to run these notebooks.
Supplementary information#
The sections here explain concepts that have been used above. These will help give you a deeper understanding of NeuroML, so we do suggest you go through them also.
The generated NeuroML model XML#
Let us investigate the generated NeuroML XML file:
<neuroml xmlns="http://www.neuroml.org/schema/neuroml2"  xmlns:xs="http://www.w3.org/2001/XMLSchema" xmlns:xsi="http://www.w3.org/2001/XMLSchema-instance" xsi:schemaLocation="http://www.neuroml.org/schema/neuroml2 https://raw.github.com/NeuroML/NeuroML2/development/Schemas/NeuroML2/NeuroML_v2.3.xsd" id="IzhSingleNeuron">
    <izhikevich2007Cell id="izh2007RS0" C="100pF" v0="-60mV" k="0.7nS_per_mV" vr="-60mV" vt="-40mV" vpeak="35mV" a="0.03per_ms" b="-2nS" c="-50.0mV" d="100pA"/>
    <pulseGenerator id="pulseGen_0" delay="0ms" duration="1000ms" amplitude="0.07 nA"/>
    <network id="IzNet">
        <population id="IzhPop0" component="izh2007RS0" size="1"/>
        <explicitInput target="IzhPop0[0]" input="pulseGen_0"/>
    </network>
</neuroml>
NeuroML files are written in XML.
So, they consist of tags and attributes and can be processed by general purpose XML tools.
Each entity between chevrons is a tag: <..>, and each tag may have multiple attributes that are defined using the name=value format.
For example <neuroml ..> is a tag, that contains the id attribute with value NML2_SimpleIonChannel.
XML Tutorial
For details on XML, have a look through this tutorial.
Is this XML well-formed?
A NeuroML file needs to be both 1) well-formed, as in complies with the general rules of the XML language syntax, and 2) valid, i.e. contains the expected NeuroML specific tags/attributes.
Is the XML shown above well-formed? See for yourself. Copy the NeuroML file listed above and check it using an online XML syntax checker.
Let us step through this file to understand the different constructs used in it.
The first segment introduces the neuroml tag that includes information on the specification that this NeuroML file adheres to.
<neuroml xmlns="http://www.neuroml.org/schema/neuroml2" xmlns:xs="http://www.w3.org/2001/XMLSchema" xmlns:xsi="http://www.w3.org/2001/XMLSchema-instance" xsi:schemaLocation="http://www.neuroml.org/schema/neuroml2 https://raw.github.com/NeuroML/NeuroML2/development/Schemas/NeuroML2/NeuroML_v2.3.xsd" id="IzhSingleNeuron">
The first attribute, xmlns defines the XML namespace.
All the tags that are defined for use in NeuroML are defined for use in the NeuroML namespace.
This prevents conflicts with other XML schemas that may use the same tags.
Read more on XML namespaces here.
The remaining lines in this snippet refer to the XML Schema that is defined for NeuroML. XML itself does not define any tags, so any tags can be used in a general XML document. Here is an example of a valid XML document, a simple HTML snippet:
<html>
<head>
<title>A title</title>
</head>
</html>
NeuroML, however, does not use these tags. It defines its own set of standard tags using an XML Schema. In other words, the NeuroML XML schema defines the structure and contents of a valid NeuroML document. Various tools can then compare NeuroML documents to the NeuroML Schema to validate them.
Purpose of the NeuroML schema
The NeuroML Schema defines the structure and contents of a valid NeuroML document.
The xmlns:xi attribute documents that NeuroML has a defined XML Schema.
The next attribute, xsi:schemaLocation tells us the locations of the NeuroML Schema.
Here, two locations are provided:
the Web URL: http://www.neuroml.org/schema/neuroml2,
and the location of the Schema Definition file (an
xsdfile) relative to this example file in the GitHub repository.
We will look at the NeuroML schema in detail in later sections.
All NeuroML files must include the neuroml tag, and the attributes related to the NeuroML Schema.
The last attribute, id is the identification (or the name) of this particular NeuroML document.
The remaining part of the file is the declaration of the model and its dynamics:
    <izhikevich2007Cell id="izh2007RS0" C="100pF" v0="-60mV" k="0.7nS_per_mV" vr="-60mV" vt="-40mV" vpeak="35mV" a="0.03per_ms" b="-2nS" c="-50.0mV" d="100pA"/>
    <pulseGenerator id="pulseGen_0" delay="0ms" duration="1000ms" amplitude="0.07 nA"/>
    <network id="IzNet">
        <population id="IzhPop0" component="izh2007RS0" size="1"/>
        <explicitInput target="IzhPop0[0]" input="pulseGen_0"/>
    </network>
The cell, is defined in the izhikevich2007Cell tag, which has a number of attributes as we saw before (see here for the schema definition):
id: the name that we want to give to this cell. To refer to it later, for example,v0: the initial membrane potential for the cell,C: the leak conductance,k: conductance per voltage,vr: the membrane potential after a spike,vt: the threshold membrane potential, to detect a spike,vpeak: the peak membrane potential,a,b,c, andd: are parameters of the Izhikevich neuron model.
Similarly, the pulseGenerator is also defined, and the network tag includes the population and explicitInput.
We observe that even though we have declared the entities, and the values for parameters that govern them, we do not state what and how these parameters are used.
This is because NeuroML is a declarative language that defines the structure of models.
We do not need to define how the dynamics of the different parts of the model are implemented.
As we will see further below, these are already defined in NeuroML.
NeuroML is a declarative language.
Users describe the various components of the model but do not need to worry about how they are implemented.
We have seen how an Izhikevich cell can be declared in NeuroML, with all its parameters.
As is evident, XML files are excellent for storing structured data, but may not be easy to write by hand. However, NeuroML users are not expected to write in XML. They should use the Python tools as demonstrated here.
The schema#
Given that NeuroML develops a standard and defines what tags and attributes can be used, let us see how these are defined for the Izhikevich cell. The Izhikevich cell is defined in version 2 of the NeuroML schema here:
    <xs:complexType name="Izhikevich2007Cell">
        <xs:complexContent>
            <xs:extension base="BaseCellMembPotCap">
                <xs:attribute name="v0" type="Nml2Quantity_voltage" use="required"/>
                <xs:attribute name="k" type="Nml2Quantity_conductancePerVoltage" use="required"/>
                <xs:attribute name="vr" type="Nml2Quantity_voltage" use="required"/>
                <xs:attribute name="vt" type="Nml2Quantity_voltage" use="required"/>
                <xs:attribute name="vpeak" type="Nml2Quantity_voltage" use="required"/>
                <xs:attribute name="a" type="Nml2Quantity_pertime" use="required"/>
                <xs:attribute name="b" type="Nml2Quantity_conductance" use="required"/>
                <xs:attribute name="c" type="Nml2Quantity_voltage" use="required"/>
                <xs:attribute name="d" type="Nml2Quantity_current" use="required"/>
            </xs:extension>
        </xs:complexContent>
    </xs:complexType>
The xs: prefix indicates that these are all part of an XML Schema.
The Izhikevich cell and all its parameters are defined in the schema.
As we saw before, parameters of the model are defined as attributes in NeuroML files.
So, here in the schema, they are also defined as attributes of the complexType that the schema describes.
The schema also specifies which of the parameters are necessary, and what their dimensions (units) are using the use and type properties.
This schema gives us all the information we need to describe an Izhikevich cell in NeuroML. Using the specification in the Schema, any number of Izhikevich cells can be defined in a NeuroML file with the necessary parameter sets to create networks of Izhikevich cells.
The generated LEMS XML#
The generated LEMS simulation file is shown below:
<Lems>

    <!--

        This LEMS file has been automatically generated using PyNeuroML v1.1.13 (libNeuroML v0.5.8)

     -->

    <!-- Specify which component to run -->
    <Target component="example-single-izhikevich2007cell-sim"/>

    <!-- Include core NeuroML2 ComponentType definitions -->
    <Include file="Cells.xml"/>
    <Include file="Networks.xml"/>
    <Include file="Simulation.xml"/>

    <Include file="izhikevich2007_single_cell_network.nml"/>

    <Simulation id="example-single-izhikevich2007cell-sim" length="1000ms" step="0.1ms" target="IzNet" seed="123">  <!-- Note seed: ensures same random numbers used every run -->
        <OutputFile id="output0" fileName="example-single-izhikevich2007cell-sim.v.dat">
            <OutputColumn id="IzhPop0[0]" quantity="IzhPop0[0]/v"/>
        </OutputFile>

    </Simulation>

</Lems>
Similar to NeuroML, a LEMS Simulation file also has a well defined structure, i.e., a set of valid tags which define the contents of the LEMS file. We observe that whereas the NeuroML tags were related to the modelling parameters, the LEMS tags are related to simulation. We also note that our NeuroML model has been “included” in the LEMS file, so that all entities defined there are now known to the LEMS simulation also. Like NeuroML, users are not expected to write the LEMS XML component by hand. They should continue to use the NeuroML Python tools.
The component_factory() function#
In the code above, we’ve used the component_factory utility function that is included in the neuroml.utils module.
This is, as the name notes, a “factory function”.
When we provide the name of a NeuroML component type (the Python class) to it
as the first argument along with any parameters, it will create a new component
(Python object) and return it to us to use, after running a few checks under
the hood:
is the created component valid?
are all the necessary parameters set?
are any extra parameters given?
We will see some of these checks in action later as we create more components for our model.
The component_factory can accept two forms.
We can either pass the component type (class) to the function, or we can pass its name as a string.
The difference is that we do not need to import the class in our script before using it if we specify its name as a string.
The component factory function will import the class for us for us internally.
Either form works, so you can choose which you prefer.
It is important to only remain consistent and use one form to aid readability.
The add() function#
We’ve used another utility method in the code above: add.
The add method calls the component_factory for us internally to create a new object of the required component.
We could also use the component_factory, followed by add, which would result in the same thing:
izh0 = component_factory(
    "Izhikevich2007Cell",
    id="izh2007RS0", v0="-60mV", C="100pF", k="0.7nS_per_mV", vr="-60mV",
    vt="-40mV", vpeak="35mV", a="0.03per_ms", b="-2nS", c="-50.0mV", d="100pA")
nml_doc.add(izh0)
In fact, we could do it all without using either method:
# from neuroml import Izhikevich2007Cell
izh0 = neuroml.Izhikevich2007Cell(
    id="izh2007RS0", v0="-60mV", C="100pF", k="0.7nS_per_mV", vr="-60mV",
    vt="-40mV", vpeak="35mV", a="0.03per_ms", b="-2nS", c="-50.0mV", d="100pA")
nml_doc.izhikevich2007_cells.append(izh0)
This last form is not suggested because here, the extra checks that the component_factory and add methods run are not carried out.
You also need to know the name of the variable in the nml_doc object to be able to append to it.
The output of the info method will list all the member names, but the add method inspects the parent component and places the child in the right place for us.
An exercise here would be to try providing invalid arguments to the add or component_factory methods.
For example:
try giving the wrong units for a parameter
try leaving out a parameter
What happens?
For example, I have used the wrong units for the d parameter here, ms instead of pA:
# or
# izh0 = component_factory(
izh0 = nml_doc.add(
    "Izhikevich2007Cell",
    id="izh2007RS0", v0="-60mV", C="100pF", k="0.7nS_per_mV", vr="-60mV",
    vt="-40mV", vpeak="35mV", a="0.03per_ms", b="-2nS", c="-50.0mV", d="100ms")
and it will throw a ValueError telling us that this does not match the expected string for d:
ValueError: Validation failed:
- Value "100ms" does not match xsd pattern restrictions: [['^(-?([0-9]*(\\.[0-9]+)?)([eE]-?[0-9]+)?[\\s]*(A|uA|nA|pA))$']]
The specific error here includes the “pattern restrictions” (regular expression) for valid values of the d parameter.
There are a number of tutorials on regular expressions on the internet that you can use to learn more about the meaning of the provided pattern restriction.
The one restriction that we are interested in here is that the value of d must end in one of A, uA, nA, or pA.
Anything else will result in an invalid value, and the factory will throw a ValueError.
The NeuroML specification declares valid units for all its components. This allows us to validate models and components while building the model—even before we have a complete model that we want to simulate. In fact, NeuroML also defines a list of units and dimensions that can be used.
Units in NeuroML
NeuroML defines a standard set of units that can be used in models. Learn more about units and dimensions in NeuroML and LEMS here.
The info() function#
Now that we have a document, what if we want to inspect it to see what components it can hold, and what its current contents are?
Each NeuroML component type includes the info function that gives us a quick summary of information about the component:
nml_doc.info()

# Also see contents:
nml_doc.info(show_contents=True)
The output will be of this form:
Please see the NeuroML standard schema documentation at https://docs.neuroml.org/Userdocs/NeuroMLv2.html for more information.

Valid members for NeuroMLDocument are:
* poisson_firing_synapses (class: PoissonFiringSynapse, Optional)
* fixed_factor_concentration_models (class: FixedFactorConcentrationModel, Optional)
* transient_poisson_firing_synapses (class: TransientPoissonFiringSynapse, Optional)
* alpha_current_synapses (class: AlphaCurrentSynapse, Optional)
* IF_curr_alpha (class: IF_curr_alpha, Optional)
* alpha_synapses (class: AlphaSynapse, Optional)
...
This shows all the valid NeuroML components that the top level NeuroMLDocument component can directly contain.
It also tells us the component type (class) corresponding to the component (object).
It also tells us whether this component is optional or required.
In the second form, where we also pass show_contents=True, it will also show the contents of each member if any.
We can use this to inspect our created Izhikevich cell component:
izh0.info(True)
The output will be:
Izhikevich2007Cell -- Cell based on the modified Izhikevich model in Izhikevich 2007, Dynamical systems in neuroscience, MIT Press

Please see the NeuroML standard schema documentation at https://docs.neuroml.org/Userdocs/NeuroMLv2.html for more information.

Valid members for Izhikevich2007Cell are:
* annotation (class: Annotation, Optional)
* b (class: Nml2Quantity_conductance, Required)
        * Contents ('ids'/<objects>): -2nS

* c (class: Nml2Quantity_voltage, Required)
        * Contents ('ids'/<objects>): -50.0mV

* d (class: Nml2Quantity_current, Required)
        * Contents ('ids'/<objects>): 100pA

* C (class: Nml2Quantity_capacitance, Required)
        * Contents ('ids'/<objects>): 100pF

* v0 (class: Nml2Quantity_voltage, Required)
        * Contents ('ids'/<objects>): -60mV

* k (class: Nml2Quantity_conductancePerVoltage, Required)
        * Contents ('ids'/<objects>): 0.7nS_per_mV

* vr (class: Nml2Quantity_voltage, Required)
        * Contents ('ids'/<objects>): -60mV

* neuro_lex_id (class: NeuroLexId, Optional)
* metaid (class: MetaId, Optional)
* vt (class: Nml2Quantity_voltage, Required)
        * Contents ('ids'/<objects>): -40mV

* id (class: NmlId, Required)
        * Contents ('ids'/<objects>): izh2007RS0

* notes (class: xs:string, Optional)
* vpeak (class: Nml2Quantity_voltage, Required)
        * Contents ('ids'/<objects>): 35mV

* properties (class: Property, Optional)
* a (class: Nml2Quantity_pertime, Required)
        * Contents ('ids'/<objects>): 0.03per_ms
We can see that all the required parameters are correctly set for this component.
We can also inspect the full document:
nml_doc.info(show_contents=True)
Try running this at the beginning of the script right after creating the document, and at the end when the model has been completed. You should notice a major change, that our cell has been correctly added to the document.
...
* izhikevich2007_cells (class: Izhikevich2007Cell, Optional)
*         * Contents ('ids'/<objects>): ['izh2007RS0']
*
...
The info() function is very useful to see what components can belong to another.
For example, to see what components can be added to our net network, we can run this:
net.info()

Network -- Network containing:  **population** s ( potentially of type  **populationList** , and so specifying a list of cell  **location** s );  **projection** s ( with lists of  **connection** s ) and/or  **explicitConnection** s; and  **inputList** s ( with lists of  **input** s ) and/or  **explicitInput** s. Note: often in NeuroML this will be of type  **networkWithTemperature**  if there are temperature dependent elements ( e. g. ion channels ).

Please see the NeuroML standard schema documentation at https://docs.neuroml.org/Userdocs/NeuroMLv2.html for more information.

Valid members for Network are:
* metaid (class: MetaId, Optional)
* notes (class: xs:string, Optional)
* properties (class: Property, Optional)
* annotation (class: Annotation, Optional)
* type (class: networkTypes, Optional)
* temperature (class: Nml2Quantity_temperature, Optional)
* neuro_lex_id (class: NeuroLexId, Optional)
* spaces (class: Space, Optional)
* regions (class: Region, Optional)
* extracellular_properties (class: ExtracellularPropertiesLocal, Optional)
* populations (class: Population, Required)
* cell_sets (class: CellSet, Optional)
* id (class: NmlId, Required)
* synaptic_connections (class: SynapticConnection, Optional)
* projections (class: Projection, Optional)
* electrical_projections (class: ElectricalProjection, Optional)
* continuous_projections (class: ContinuousProjection, Optional)
* explicit_inputs (class: ExplicitInput, Optional)
* input_lists (class: InputList, Optional)
This tells us what net can contain.
For setting the input, for example, it would seem that we should use one of either ExplicitInput or InputList here.
The ctinfo function can be used to get more information about these (next).
The ctinfo() function#
There are multiple ways of getting information on a component type. The first, of course, is to look at the schema documentation online. The documentation for ExplicitInput is here, and for InputList is here. The schema documentation will also include examples of usage for most component types under the “Usage:Python” tab.
neuroml includes the ctinfo() utility function, that like the info() method, provides information about component types (ct in ctinfo stands for component type).
Note that component types are classes and the info() method cannot be used on them.
It can only be used once objects have been created from the component type classes.
So, we could do (create a new dummy object of the class and call info() on it):
neuroml.ExplicitInput().info()
but ctinfo will do this for us:
from neuroml.utils import ctinfo
ctinfo("ExplicitInput")
# or the second form:
# ctinfo(neuroml.ExplicitInput)
ExplicitInput -- An explicit input ( anything which extends  **basePointCurrent**  ) to a target cell in a population

Please see the NeuroML standard schema documentation at https://docs.neuroml.org/Userdocs/NeuroMLv2.html for more information.

Valid members for ExplicitInput are:
* destination (class: xs:string, Optional)
* target (class: xs:string, Required)
* input (class: xs:string, Required)


ctinfo("InputList")
InputList -- An explicit list of  **input** s to a **population.**

Please see the NeuroML standard schema documentation at https://docs.neuroml.org/Userdocs/NeuroMLv2.html for more information.

Valid members for InputList are:
* populations (class: NmlId, Required)
* component (class: NmlId, Required)
* input (class: Input, Optional)
* input_ws (class: InputW, Optional)
* id (class: NmlId, Required)
Finally, for completeness, we can also get information from the API documentation for libNeuroML here. Since this is documentation that is “embedded” in the Python classes, we can also use the Python in-built help function to see it:
help(neuroml.ExplicitInput)
Help on class ExplicitInput in module neuroml.nml.nml:

class ExplicitInput(BaseWithoutId)
 |  ExplicitInput(target: 'one str (required)' = None, input: 'one str (required)' = None, destination: 'one str (optional)' = None, gds_collector_=None, **kwargs_)
 |
 |  ExplicitInput -- An explicit input ( anything which extends  **basePointCurrent**  ) to a target cell in a population
 |
 ...


help(neuroml.InputList)
Help on class InputList in module neuroml.nml.nml:

class InputList(Base)
 |  InputList(id: 'one NonNegativeInteger (required)' = None, populations: 'one NmlId (required)' = None, component: 'one NmlId (required)' = None, input: 'list of Input(s) (optional)' = None, input_ws: 'list of InputW(s) (optional)' = None, gds_collector_=None, **kwargs_)
 |
 |  InputList -- An explicit list of  **input** s to a **population.**
 ...
The information provided by the different sources will be similar, but ctinfo() is perhaps the most NeuroML specific (whereas the Python help() function provides Python language related information also.)
Use an integrated development environment (IDE):
IDEs make programming easier. For example, a good IDE will show you the documentation that the help Python function shows.
Another useful function is the ctparentinfo() function.
Like info() it provides some information about the component/object:
ctparentinfo("InputList")
InputList -- An explicit list of  **input** s to a **population.**

Please see the NeuroML standard schema documentation at https://docs.neuroml.org/Userdocs/NeuroMLv2.html for more information.

Valid parents for InputList are:
* Network
        * input_lists (class: InputList, Optional)
This tells us that components of type InputList can be added to components of the Network type, in the input_list member.
Of course, we will use the add function in our network object net, and that will add the component to the correct member.
The validate() function#
We can check whether each component is valid using the validate function that each component has.
For example:
net.validate()
This function does not return anything if the component is valid.
(Technically, if a function does not return anything in Python, it returns
None by default, so this returns None if the component is valid.)
However, if it is not valid, it will throw a ValueError.